Difficulty
Moderate
Steps
7
Time Required
00:01:30
- Module 9a & b 7 steps

User-Contributed Guide
This guide is not managed by the site's staff.
Quiz
0
Introduction
We are going to break down the framing into 11 framing modules that will be assembled on the ground in parallel with other construction processes.
This is the how-to for the modules of the 2nd floor. Starting from the south, they are labeled 4-9 with an "a" and "b" distinction referencing their location on either west or east respectively.
Tools
Parts
No parts specified.
-
-
Gather materials for mod 9a&b (these are enough materials for BOTH walls)
-
8:2x4x8
-
2:2x4x10
-
2 sheets of 3/4"x4'x8' OSB for exterior sheathing
-
2 sheets of 1/2"x4'x8' plywood for interior sheathing
-
~buncha 3-1/8" construction screws
-
~buncha 1-5/8" coated deck screws
-
-
-
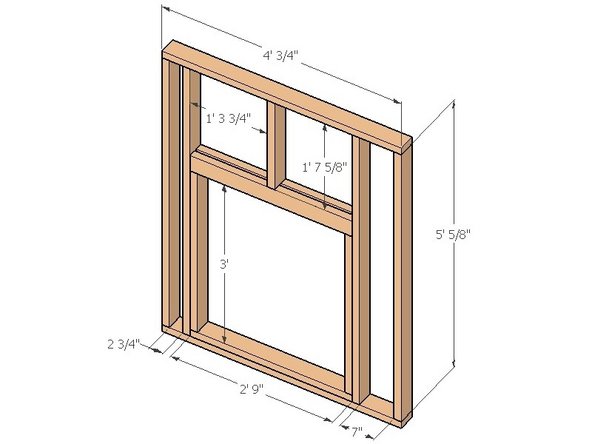
Assemble Framing
-
Place vertical studs (60-5/8") inside horizontal top and bottom plates (48-3/4")
-
Sandwich plywood strip between two of the three 33" pieces and screw together (three screws across length is fine)
-
Use sandwich to form top of window box, use 3' members to form sides and remaining 2'9" member for the base; screw together with 3-1/8" screws (toe-in screws at a diagonal into top plate from side members) - IMPORTANT Window hole must be at least 3'tall by 30" wide
-
Screw one stud (60-5/8") to either side of window box; letting top of studs hang free off the top of the window box but making sure they are all aligned at the bottom
-
Toe-in center vertical above window box
-
Place top and bottom plate such that vertical studs at edges leave a gap of 7" to one side of window, and 2-3/4" on the other.
-
-
-
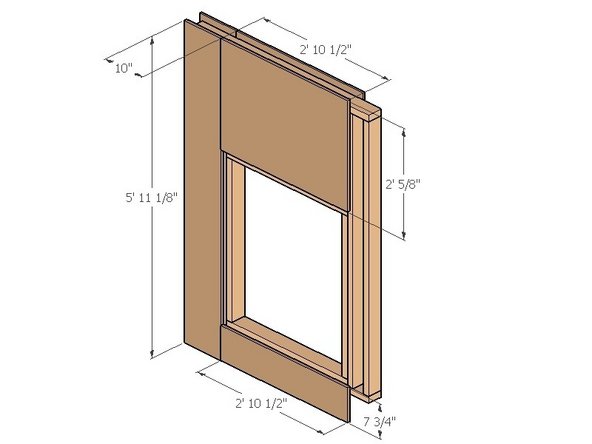
Cut and attach Exterior Sheathing (OSB)
-
1: 34-1/2"x24-5/8"x3/4" OSB
-
1: 34-1/2"x7-3/4"x3/4" OSB
-
1: 71-1/8"x10"x3/4" OSB
-
Place assembled frame on table/ground with narrow stud-gap on right and window on bottom
-
Place tall strip over left stud-gap so that half the outer 2x4 of the window frame is exposed, and leave a 6" overhang along the bottom edge. This should leave a 1.5" overhang off the top and a 3/4" overhang off the left side. screw in at 16" spacing with 1-5/8" screws
-
Place smaller strip along the bottom leaving a 6" overhang off the bottom and butting up against right edge of first osb strip; screw in at 16" spacing with 1-5/8" screws
-
place remaining piece butted against right edge of first osb strip, and aligned with the top yielding a continuation of the 1.5" overhang at the top. the right edge should cover half the stud-face; screw in at 16" spacing with 1-5/8" screws
-
-
-
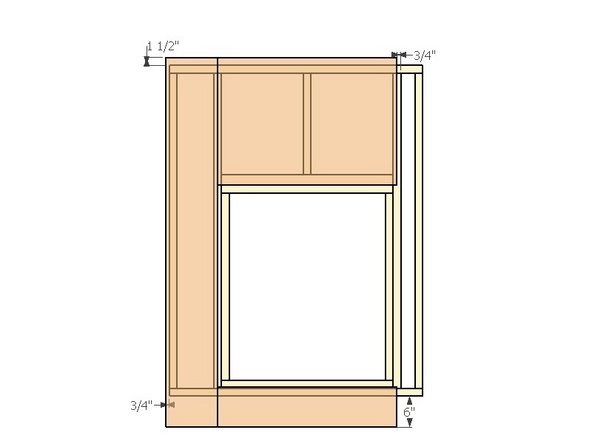
Cut and attach interior sheathing (plywood)
-
1: 34-1/2"x24-5/8"x1/2" plywood
-
1: 65-1/8"x10"x1/2"plywood
-
Place long strip flush against bottom and leaving a 3/4" overhang off the right edge; this should leave the left edge halfway across outermost stud of window frame
-
place remaining piece butted up against left edge of tall strip (over the window) and aligned with the tall strip at the top.
-
There should be a 1.5" overhang along the top
-
Screw all in @ 16" spacing into all any spanned stud and along perimeter
-
-
-
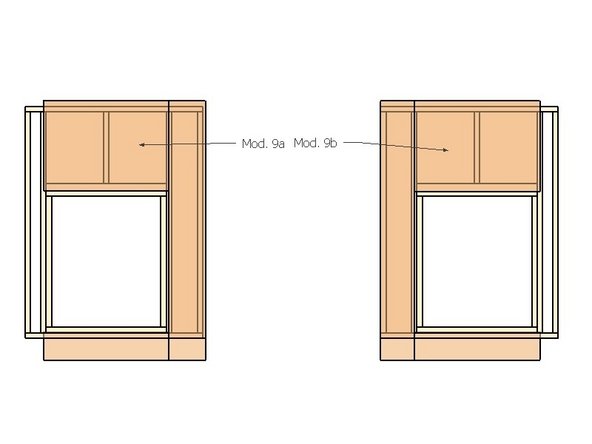
Module 9b is basically the same thing
-
Build the framing exactly the same and cut the sheathing identically, but attach to opposite sides.
-
So essentially, after the framing is built and before the exterior sheathing (osb) goes on, place the assembled frame on the table/ground with the narrow stud-gap on the left instead of right and the window on the bottom.
-
Attach sheathing as in step 4 and continue following all directions.
-